1
Step 1
Bond User Guide
Table of Contents
Accounting
Need more help? Send us a message.
Account Creation
To access Bond, you’ll need to connect with an Account Executive. The Account Executive will ask for your email which will be used as your login credential. After the Account Executive sets up your account, you should be able to receive an email containing the login instructions for Bond. ⇑ BACK TO TOP
HQ Users to Bond
By default, all HQ users have access to Bond. A password reset is needed from the Bond login page to unify the access for both accounts. To reset your password:
- Visit eliteanywhere.bondlabs.io and click Forgot Password.
- Enter the email address associated with the user’s HQ account, then click Request Reset Link.
- If the system identifies the email address linked to the user’s HQ account, a confirmation message will appear.
- Check your email inbox for a message from Bond. Click on the Reset Password Link shown in the email.
- The user will be redirected to the Reset Password Page. Please have the user enter the new password and click Request Password.
- If the password change is successful, the user will be redirected to the login page. Please log in using your email address and new password. ⇑ BACK TO TOP
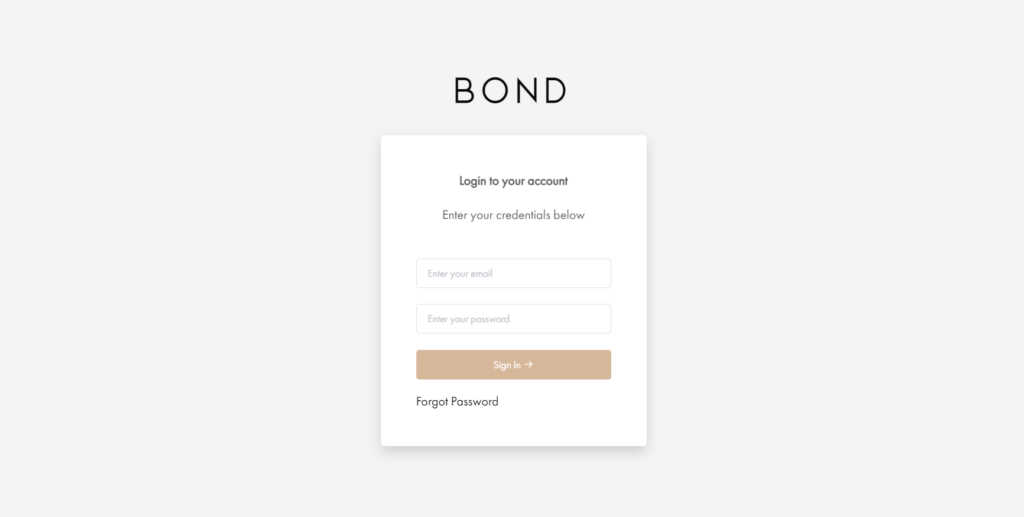
Logging In
1. Go to eliteanywhere.bondlabs.io
2. Enter the email address and password associated with your Bond account. ⇑ BACK TO TOP
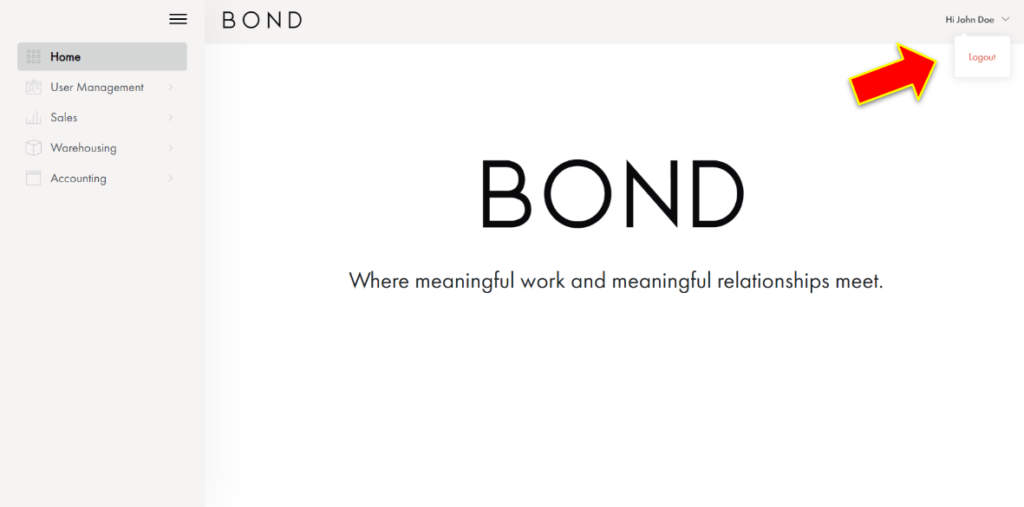
Logging Out
- To log out, click or hover on your name found on the right-most part of the page then click Logout. ⇑ BACK TO TOP
Reset Password
Two options to reset your password:
OPTION 1 – Password Reset Request via Another User:
- Click on User Management, then User.
- Click on the User that needs a password reset.
- On the User Profile column, find the Password Settings section and click on Reset Password.
- A warning message will appear. Choose No to cancel the action and choose Yes to proceed.
- When successful, you will be shown a confirmation message and the user’s password is reset. The user will also receive an email containing a link for the password reset. Make sure to have the user check the email address associated with the Bond account. Please have the user access the password reset link.
- The user will be redirected to the Reset Password Page. Please have the user enter the new password and click Request Password.
- If the password change is successful, the user will be redirected to the login page. Please log in using your email address and new password. ⇑ BACK TO TOP
OPTION 2 – Password Reset Request via Login Page:
- Visit eliteanywhere.bondlabs.io.
- Click Forgot Password.
- Enter the email address associated with the user’s Bond account, then click Request Reset Link.
- If the system identifies the email address linked to the user’s Bond account, a confirmation message will appear.
- Check your email inbox for a message from Bond. Click on the Reset Password Link shown in the email.
- The user will be redirected to the Reset Password Page. Please have the user enter the new password and click Request Password.
- If the password change is successful, the user will be redirected to the login page. Please log in using your email address and new password. ⇑ BACK TO TOP
User Management Module
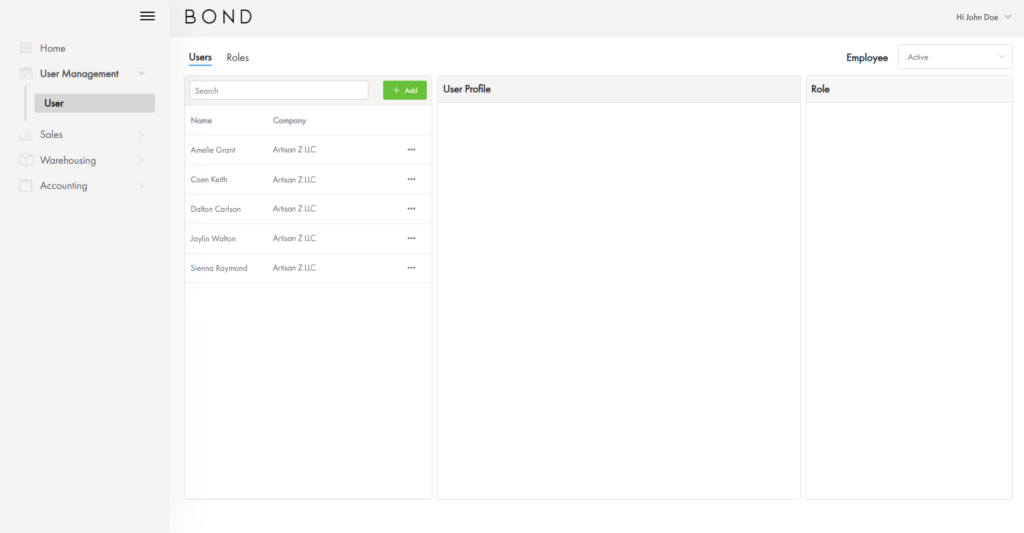
This module allows the account administrators to manage the users. Here you can add a user, assign a role, and set what the user can do within Bond. Additionally, any role with User Management permissions can access this module. Learn more about permissions here.
By default, Customer Admin is the role assigned to the first user of the company account.
If you want to add a user with the same permission as a Customer Admin please proceed in Adding a User, otherwise Create a Role first to set your desired permissions, and then assign that role to the new user.
Users – in this tab you can edit users, search for users, add users, view user information, view user roles, and view active or suspended users.
Roles – in this tab you can edit roles, search for roles, add roles, view and edit permissions for each role, and view users assigned to that role. ⇑ BACK TO TOP
Creating a Role
- On the left side of the page, click User Management then Users.
- Click on the Roles tab.
- On the left column, click on the Add button. A pop-up window will appear. Enter the role name, then click on Create.
- If successful, a message stating “Role created successfully.” will be shown and the newly created role should appear in the left column of the Roles page. ⇑ BACK TO TOP
Assigning a Role to a User
There are two ways on how to assign roles to a user.⇑ BACK TO TOP
Option 1:
- From the homepage, select User Management and then users.
- From the users page, select Roles tab.
- Select a role and click the Assign button.
- Choose the user by selecting the assign button.
Option 2:
- From the homepage, select User Management and then Users.
- Choose a user and click the Assign Roles button.
- Select a role and click the Assign button.
Renaming a Role
- On the left column of the Roles page, click on the three dots beside the role you want to rename.
- Select Rename.
- Input a new role name and click the OK button. Press cancel to cancel the deletion.
- If successful, a message stating “Role renamed successfully” will appear and the changes should reflect on the roles list. ⇑ BACK TO TOP
Deleting a Role
- First, click on User Management then User. Now click on the Roles tab.
- On the left column of the Roles page, click on the three dots beside the role you want to delete.
- Select Delete.
- To confirm deleting the role, choose OK. Press cancel to cancel the deletion. ⇑ BACK TO TOP
About Role Permissions
Generally, Bond lets you choose which specific action you are allowing the users for that role by selecting the checkbox individually, and selecting ‘All’ allows the user to do the indicated actions for that section. Here are most of the actions you can set in the Permissions column:
- Accounting
- Invoices – Download, Read, and Print.
- Payments – Create, Read, and Download.
- Sales
- Quoting Request – Create, Update, and Read.
- Quoting – Approve, Download, Read, Decline, and Print.
- User Management
- Roles – Create, Read, Update, Delete, and Unassign.
- Users – Activate, Assign, Delete, Suspend, Update, Archive, Create, Read, and Unassign.
- Warehousing
- Inspections (Failed, Pending, and Repairs) – Read and Update.
- Inventory – Download and Read.
- Receiving – Download, Read, and Print.
Setting Permissions to a Role
Only roles with User Management permissions can customize the permissions per role.
To set the permissions for each role:
- Click on User Management, then Users.
- From the Users page, click on the Roles tab.
- On the left column, click on a Role. The middle column will show the Permission settings for the role.
- Each module like Accounting, Sales, User Management, and Warehousing has separate permissions to set. When you tick the checkbox, the user assigned to that Role will gain access to the actions stated.
- To save the set permissions, click on the Save button. ⇑ BACK TO TOP
Adding a User
- To create a user, click on User Management, then User.
- On the Users tab, click ‘Add’ button found in the left column. A New User window will appear on the right side of the page.
- Fill in all of the required information as indicated with a red asterisk.
- To save the information, click Save. To cancel adding a new user, click Cancel.
- When successful, the new user should appear on the Active Employee Users list in the left column. You can find more information about the user by clicking on the user name. User Profile information will appear in the middle column and Role information will appear in the right column. ⇑ BACK TO TOP
Editing a User Profile
- To edit a user, click on User Management, then User.
- From the users list on the Users tab, click on the three dots beside the Company.
- Choose Edit. The Edit User window will appear.
- After doing the necessary edits, click on Update Button to finish editing the user. To cancel, click on the cancel button.
Suspend a User
When a user is suspended, the user will still have account access but won’t be able to view any module. To suspend a user:
- Click on User Management, then User.
- Click on the three dots beside the User, and choose Suspend.
- A confirmation message will appear. Click Yes to suspend the user, and click Cancel to cancel the user suspension.
- When user suspension is successful, you will be shown a confirmation message and the suspended user will disappear from the Active Employee Users list. ⇑ BACK TO TOP
Viewing Suspended User
- Click on User Management, then User.
- On the Users page, click on the Employee dropdown from the top right side of the page and choose Suspended.
- When successful, you should be able to see the list of suspended users.
- Additionally, you can find more information about the user by clicking on the User. User Profile information will appear in the middle column and Role information will appear in the right column. ⇑ BACK TO TOP
Activating a Suspended User
- Click on User Management, then User.
- On the Users tab, click on the Employee dropdown from the top right side of the page and choose Suspended.
- From the Users tab, click on the three dots beside the Company Name.
- Choose Activate.
- A confirmation message will appear. Choose Yes to activate User. Choose Cancel to cancel the action.
- When user activation is successful, you will be shown a confirmation message and the activated user will disappear from the Suspended Employee Users list. ⇑ BACK TO TOP
Deleting a User
- Click on User Management, then User.
- Click on the three dots beside the User, and choose Delete.
- A confirmation message will appear. Choose cancel to cancel action and choose Yes to proceed.
- When user deletion is successful, you will be shown a confirmation message and the deleted user will be removed from the system. ⇑ BACK TO TOP
Sales
All quotation documents sent by an Account Executive can be found here. ⇑ BACK TO TOP
Approve or Decline Quote
- From the home page, select Sales then select Quote.
- From the ready tab, choose quote, choose between Approve or Decline button. ⇑ BACK TO TOP
Request a New Quote from Existing Quote
- From the homepage, select Sales and then Quote.
- Choose quote and select Menu and then Duplicate.
- Update the necessary fields and select Request Quote button.
- You can also save a draft of the quote by selecting Save Draft button. ⇑ BACK TO TOP
Warehousing Module
This module allows the user to view information about their items in storage at our hubs. Information such as items that have been received (Receiving), items for inspection (Inspections), and items in the inventory (Inventory). ⇑ BACK TO TOP
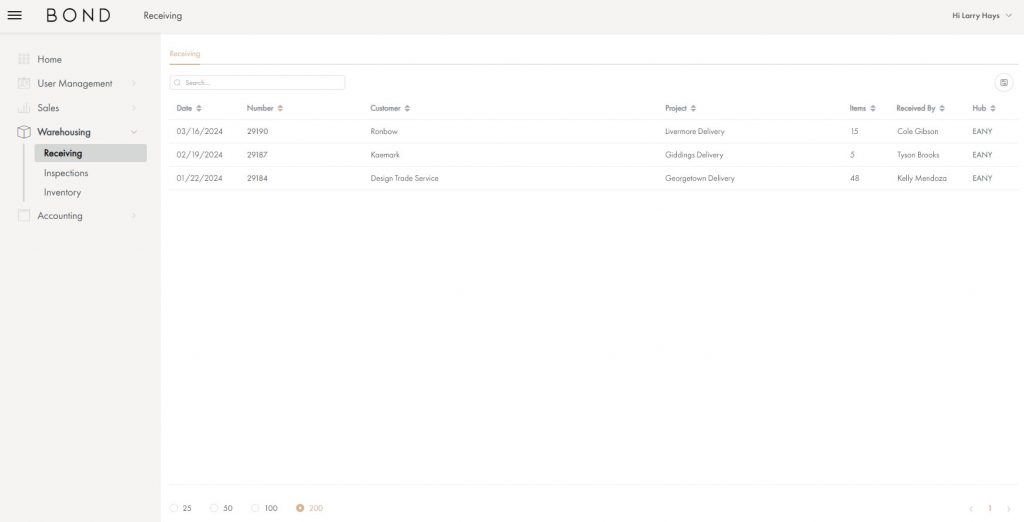
Receiving
This submodule displays the list of received items.
Clicking the up or down arrow on the right side of the column title will rearrange the list of items in an ascending, descending, or alphabetical order.
To filter the data shown, use the Search field or Filter Menu found on the right side of the page.
Choosing the numbers indicated at the bottom of the page will show 25, 50, 100, or 200 items.
To view the Receiving Report, click an item. ⇑ BACK TO TOP
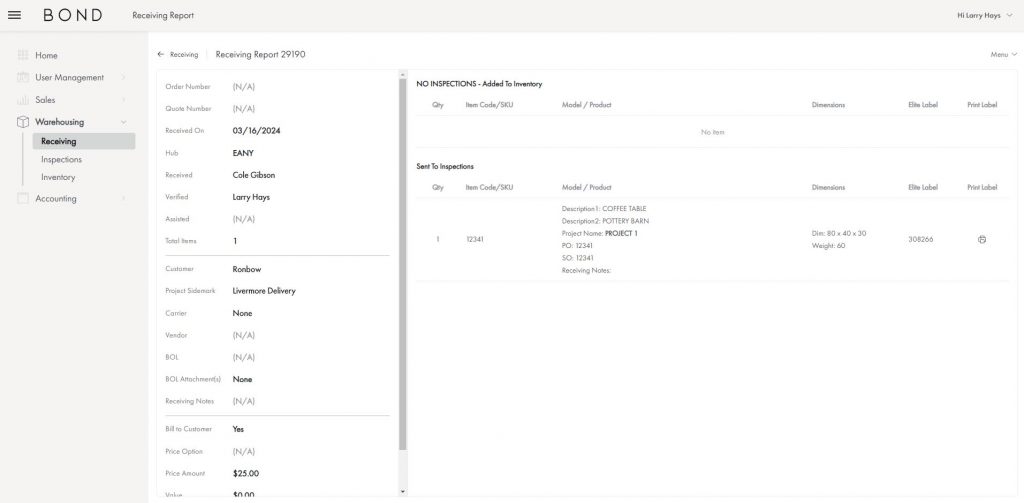
Receiving Report
This page will show every item that went through the receiving process. The left side of the page will show the general details of the receiving report while the right side will show item-specific information like quantity, item code/SKU, model/product, dimensions, and Elite label numbers.
To print the item label, click the printer icon found on the right side of the item under the Print Label column.
Click on the Menu on the right side of the page to Print the Receiving Report, Print Labels, or download the Receiving Report in a PDF file. ⇑ BACK TO TOP
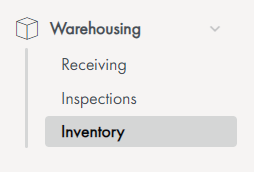
Inspections
This submodule displays Pending, Failed, for Repairs, and Passed items. ⇑ BACK TO TOP
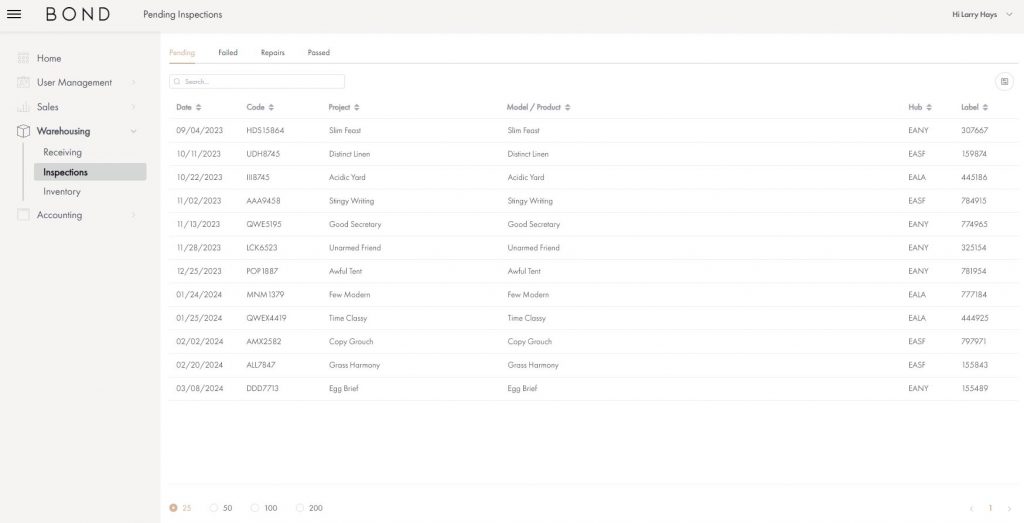
Pending Inspections
This tab shows items that are pending for inspection.
Clicking the up or down arrow on the right side of the column title will rearrange the list of items in ascending, descending, or alphabetical order.
To filter the data shown, use the Search field or Filter Menu found on the right side of the page.
Choosing the numbers indicated at the bottom of the page will show 25, 50, 100, or 200 items. ⇑ BACK TO TOP
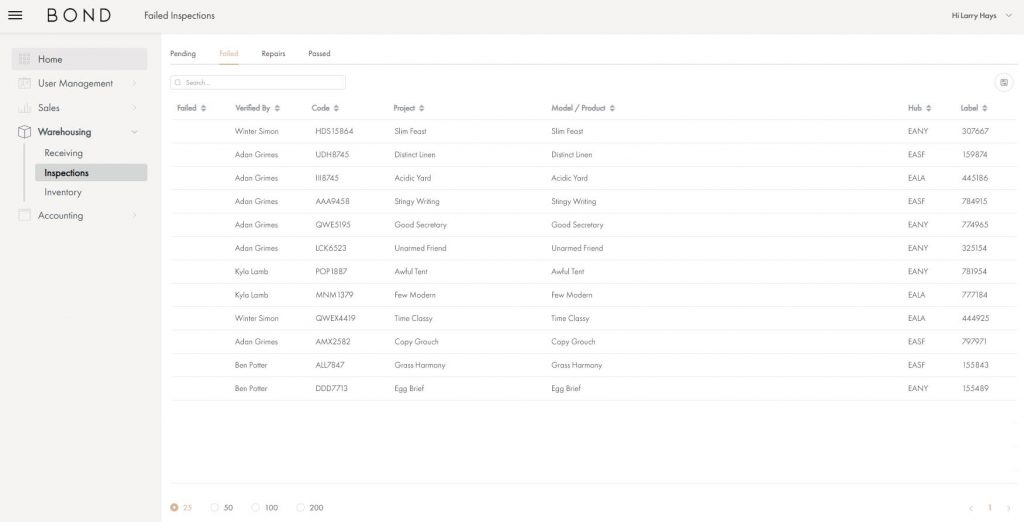
Failed Inspections
This tab shows items that have failed the inspection.
Clicking the up or down arrow on the right side of the column title will rearrange the list of items in ascending, descending, or alphabetical order.
To filter the data shown, use the Search field or Filter Menu found on the right side of the page.
Choosing the numbers indicated at the bottom of the page will show 25, 50, 100, or 200 items.
Click on the item to view more details, view inspection notes, or send a message to the Warehousing Team using the Chat tab. ⇑ BACK TO TOP
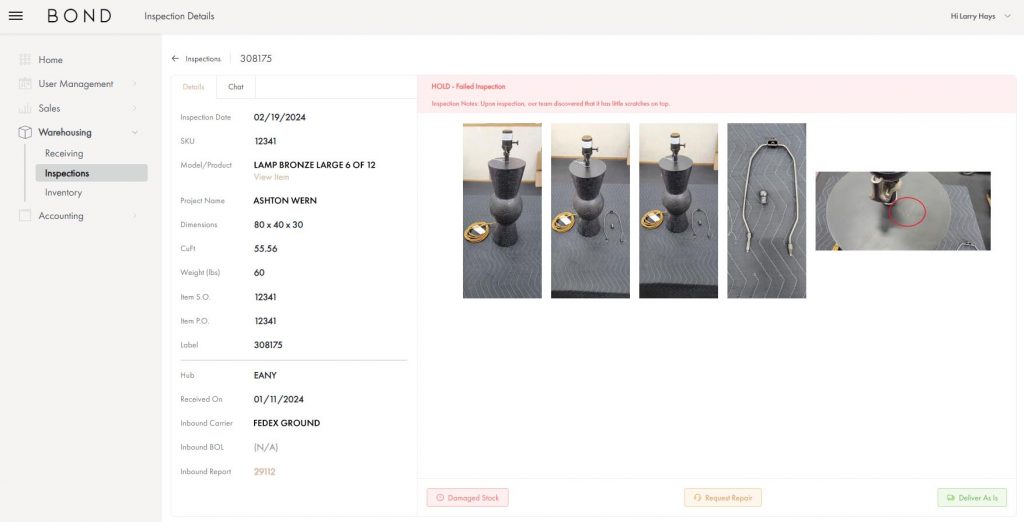
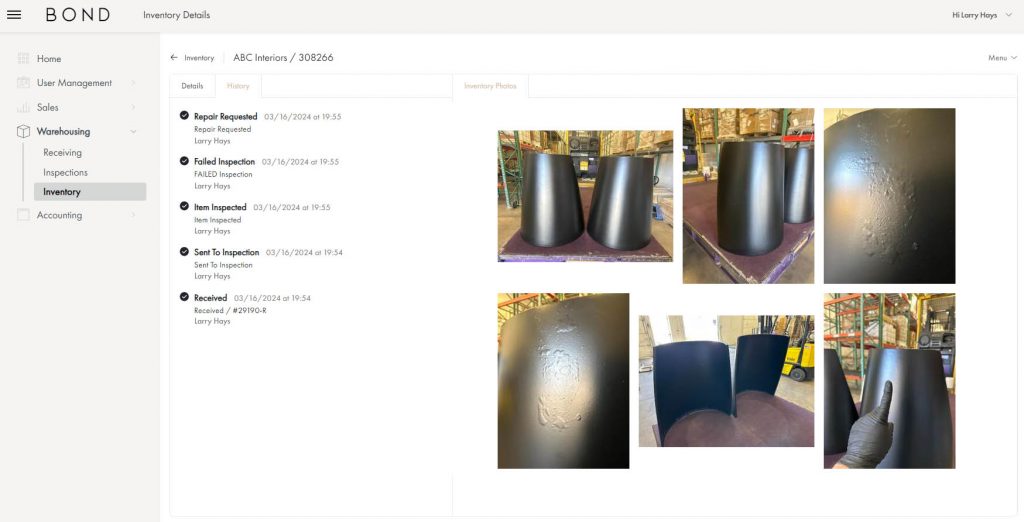
Inspection Details
More details about the item that failed the inspection can be found here complete with photos and notes. You can also tag this item as Damaged Stock, Request Repair or Delivery As Is.
Use the Chat tab to leave a message to the Warehousing Team. ⇑ BACK TO TOP
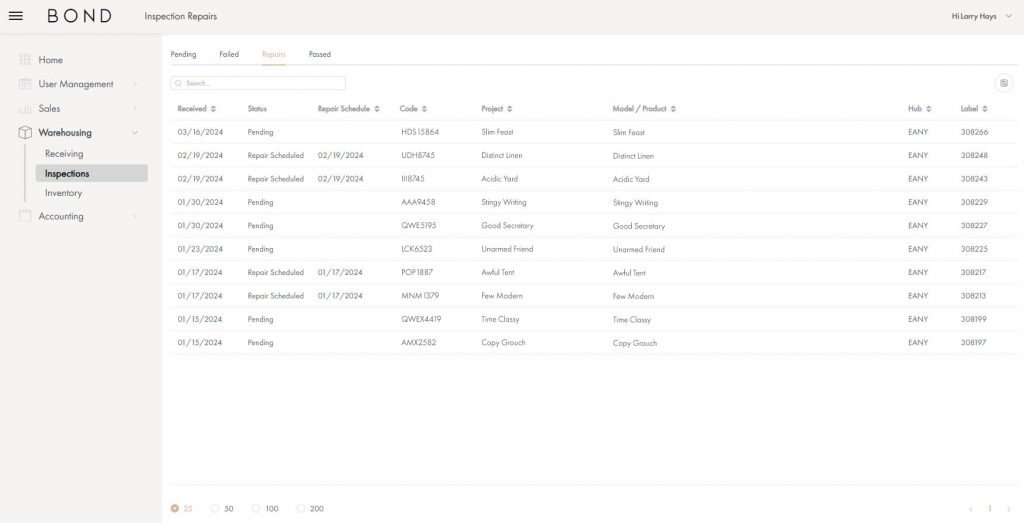
Repairs
This tab shows items that have been approved for repair.
Clicking the up or down arrow on the right side of the column title will rearrange the list of items in ascending, descending, or alphabetical order.
To filter the data shown, use the Search field or Filter Menu found on the right side of the page.
Choosing the numbers indicated at the bottom of the page will show 25, 50, 100, or 200 items.
Click on the item to view more details, view inspection and repair notes, or send a message to the Warehousing Team using the Chat tab. ⇑ BACK TO TOP
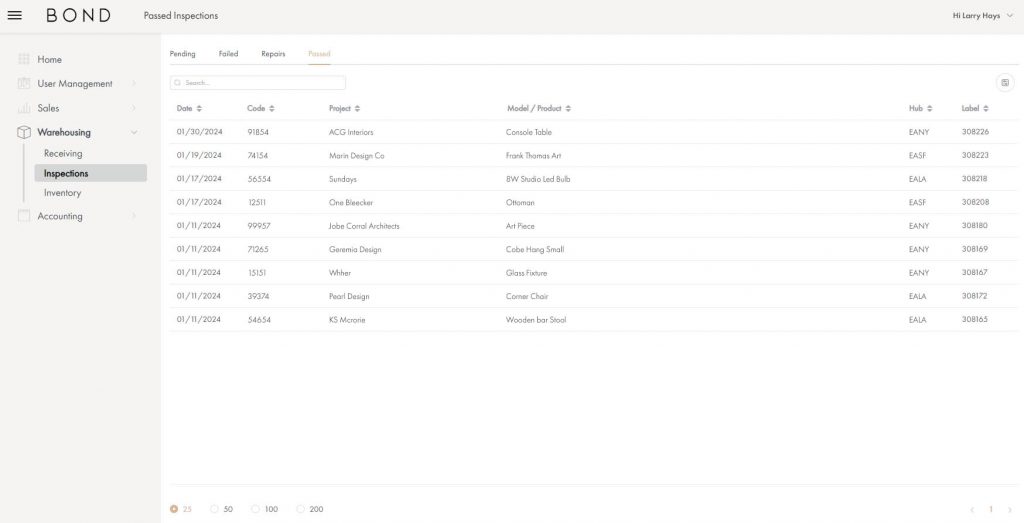
Passed
This tab shows items that have passed the inspection process.
Clicking the up or down arrow on the right side of the column title will rearrange the list of items in ascending, descending, or alphabetical order.
To filter the data shown, use the Search field or Filter Menu found on the right side of the page.
Choosing the numbers indicated at the bottom of the page will show 25, 50, 100, or 200 items.
Click on the item to view more details, view inspection notes, or send a message to the Warehousing Team using the Chat tab. ⇑ BACK TO TOP
Inventory Submodule
This submodule displays items that are In Stock, Released, and Inventory Report Download history. ⇑ BACK TO TOP
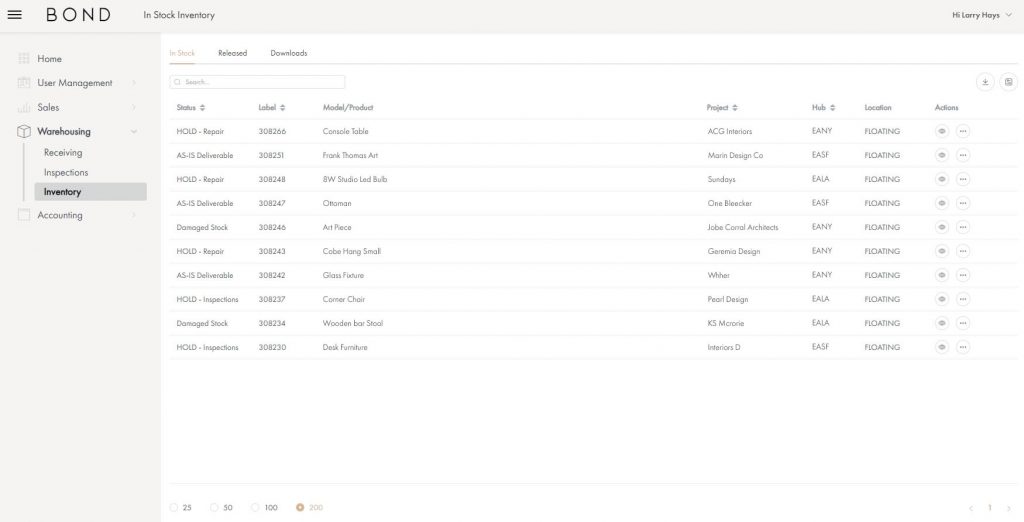
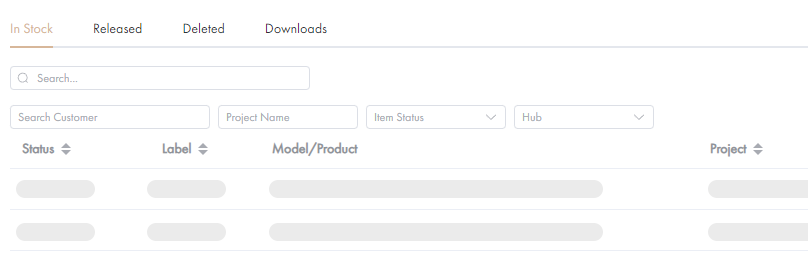
In Stock
This tab display items that are in stock.
Clicking the up or down arrow on the right side of the column title will rearrange the list of items in ascending, descending, or alphabetical order.
To filter the data shown, use the Search field or Filter Menu found on the right side of the page.
To export or download the in stock inventory list, click on the download button. You can choose between a pdf file or a csv file. CSV files will be available for download right a way. All pdf download requests are logged into the Downloads tab.
Choosing the numbers indicated at the bottom of the page will show 25, 50, 100, or 200 items.
Click on an item to view more details.
The Quick View button will display an Item Quick View window to the right side of the page. The view more details, click View Item button.
To view more items with same SKU, click on the Same SKU button.
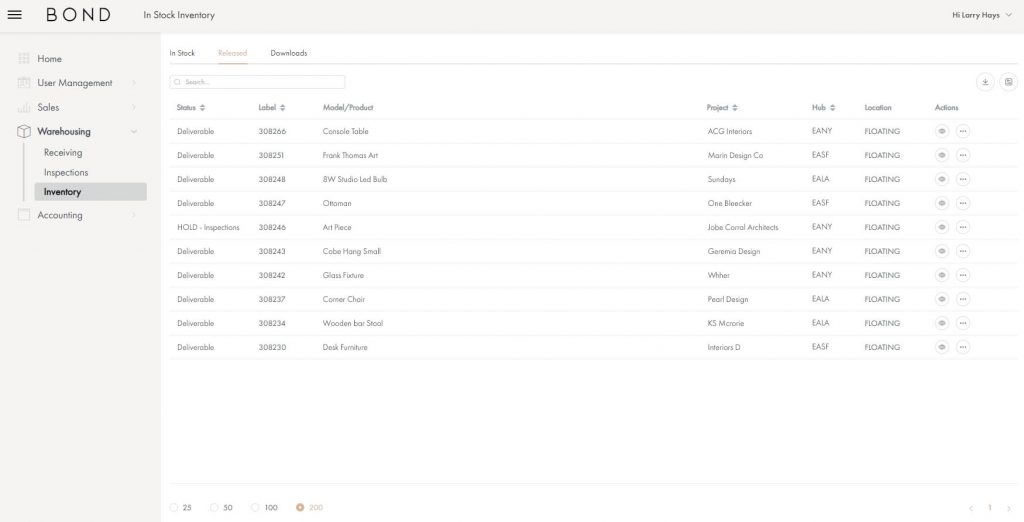
Released
This tab displays released items.
Clicking the up or down arrow on the right side of the column title will rearrange the list of items in ascending, descending, or alphabetical order.
To filter the data shown, use the Search field or Filter Menu found on the right side of the page.
To export or download the released inventory list, click on the download button. You can choose between a pdf file or a csv file. All pdf download requests are logged into the Downloads tab.
Choosing the numbers indicated at the bottom of the page will show 25, 50, 100, or 200 items.
Click on an item to view more details.
The Quick View button will display an Item Quick View window to the right side of the page. The view more details, click View Item button.
To view more items with same SKU, click on the Same SKU button.
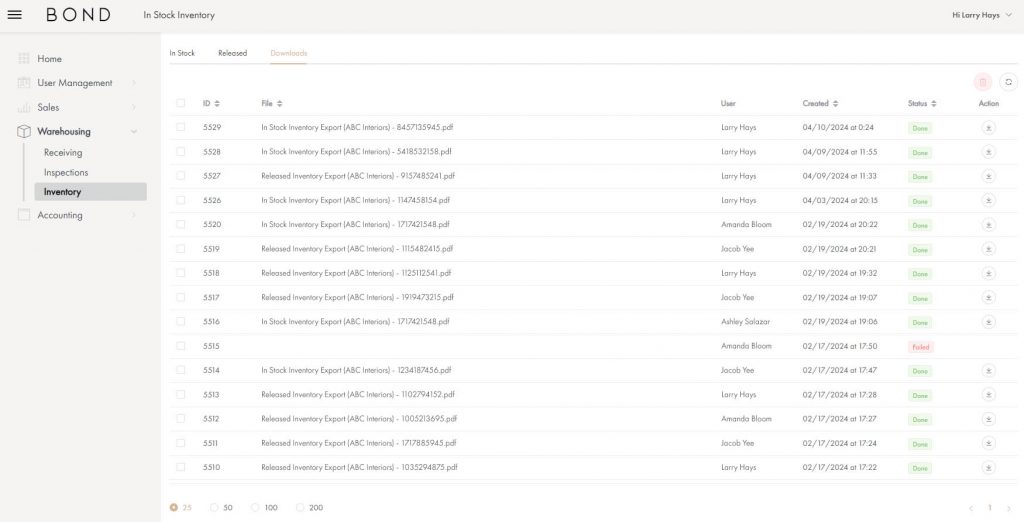
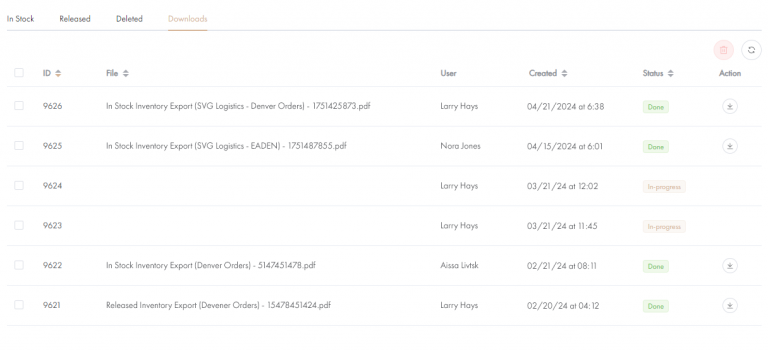
Downloads
This tab displays requested pdf file downloads for In Stock and Released inventory list.
Done status indicates the file is ready for download. Click on the download button to initiate download.
If file is still on Queue, please click on refresh to refresh the list.
Clicking the up or down arrow on the right side of the column title will rearrange the list of items in ascending, descending, or alphabetical order.
Clicking on the numbers indicated at the bottom of the page will show more items.
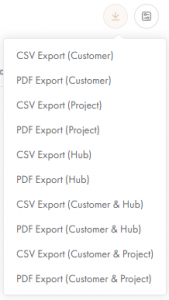
How to Download In Stock or Released Inventory
With this guide you can download In Stock or Released inventory list by Customer, Project, Hub, Customer & Hub, and Customer & Project. Available file types are CSV and PDF.
Filters feature need to be enabled first before you can download an inventory list.
To start, go to Warehousing > Inventory module, choose In Stock or Released.
Next, click on the ![]() Filters icon found on the right side of the screen. Filter fields will appear near the search bar.
Filters icon found on the right side of the screen. Filter fields will appear near the search bar.
Start inputting the search either by Customer, Project Name, or Hub. The  download button will activate once you use any of those fields except the Item Status.
Click on the download button
download button will activate once you use any of those fields except the Item Status.
Click on the download button
Click on the download button and choose the list and file type. CSV Export will be available almost immediately while PDF Export may take some time depending on inventory.
If you choose PDF Export, you will be automatically redirected to the Downloads tab. Here you will see the list of files in progress or available for download. To download the file that you need, click on the download button.
History
This sub-tab provides item history complete with date and time, action, and name. Click the photos to zoom in. ⇑ BACK TO TOP
Inspections – Request for a Repair
- From the homepage, select Warehousing and then Inspections.
- Choose the item, and select the request repair button.
- The chosen item requested for repair will be transferred to the Repairs tab.
- To communicate with the Warehousing Team assigned to your items, select the Chat tab. ⇑ BACK TO TOP
Inspections – Request to “Deliver As Is”
- From the homepage, select Warehousing and then Inspections.
- Choose the item and select the Deliver As Is button. ⇑ BACK TO TOP
Online Payments
- From the homepage, select Accounting and then Invoices.
- Choose the invoice item and select Process Payment button.
- A payment portal will show up. Fill-in the necessary fields and select Pay.
Need more help? Send us a message.
A complete end-to-end logistics company. From receiving to last-mile delivery and everything in between, our staff delivers a true white glove experience with meticulous care and attention to detail. Need something pickup up, crated, and delivered - anywhere in the world? Let's get started!
Call us at:
Email us at:
Our corporate office: